Want to know how to apply thermal paste to cpu? Whether you’re building a new one or upgrading your current setup, applying thermal paste is an important step you shouldn’t skip. Thermal paste is like a special layer that helps your CPU stay cool by letting heat move away easily. Keeping your processor cool means it runs faster and lasts longer.
If you’re new to applying thermal paste, don’t worry! This easy guide will teach you how to choose the right thermal paste and apply it correctly to keep your CPU cool and running smoothly. Say goodbye to overheating and enjoy a better performance!
What is Thermal Paste?
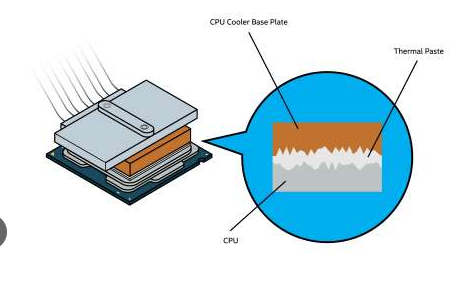
Thermal paste (also called thermal compound or grease) is a soft material placed between a computer chip,like a CPU or GPU,and its cooler. Even if the surfaces look smooth, tiny air gaps exist, and since air doesn’t conduct heat well, these gaps reduce cooling efficiency.
Thermal paste fills these gaps, helping heat move from the chip into the cooler more effectively. Without thermal paste, the chip can overheat, slow down (known as thermal throttling), or even get damaged over time.
Types of Thermal Paste
- Metal-Based: Best heat transfer but electrically conductive, risky if spilled.
- Ceramic/Silicone-Based: Safe and beginner-friendly, decent cooling.
- Carbon-Based: Non-conductive, long-lasting, better performance.
- Liquid Metal: Best thermal conductivity, but risky and for experts only.
Thermal paste is a small but crucial part of keeping your devices cool. For most users, ceramic or carbon pastes are easy and safe choices. If you need the best performance and know what you’re doing, metal-based or liquid metal pastes can offer better cooling,but they come with higher risks.
What You’ll Need Before Applying Thermal Paste
- CPU (Processor): This is the brain of your computer. You’ll be either installing a new CPU or reapplying thermal paste on your current one.
- CPU Cooler: This device keeps your CPU cool and prevents overheating. It can be:
- An air cooler (with a fan and metal heatsink), or
- A liquid cooler (with a water block and radiator).
- Thermal Paste: This paste goes between the CPU and the cooler. It fills tiny air gaps to help heat move efficiently from the CPU to the cooler. It may come with your cooler or be purchased separately.
- Isopropyl Alcohol (90% or higher preferred): Used to clean off the old thermal paste, ensuring the surfaces are clean before applying the new paste.
- Lint-Free Cloth, Coffee Filter, or Q-Tips: Used to gently wipe the CPU and cooler surfaces after applying alcohol. These materials don’t leave fibers behind, which could affect cooling.
- (Optional) Plastic Spreader or Applicator: Helps spread the thermal paste evenly if you don’t want to rely on the pressure from the cooler. A clean credit card edge works well.
Why These Items Matter:
- Thermal Paste: Ensures good heat transfer between the CPU and cooler.
- Isopropyl Alcohol: Cleans surfaces for better paste adhesion.
- Lint-Free Cloth/Q-Tips: Cleans without leaving residue or fibers.
- Plastic Spreader: Optional tool for even paste application.
Quick Checklist Before You Start:
- CPU
- CPU cooler (air or liquid)
- Thermal paste
- Isopropyl alcohol (90% or higher recommended)
- Lint-free cloth, coffee filter, or Q-tip
- (Optional) Spreader tool
Preparing for Application
- Turn Off and Unplug Your PC
Always shut down your computer and unplug it from the power outlet before starting. This keeps you safe and prevents any risk of electric shock. Before touching any internal parts, ground yourself by touching a metal part of the computer case to discharge any static electricity that could damage components.
- Clean the Old Thermal Paste
- Remove the CPU Cooler: Gently remove the cooler from your processor. If it feels stuck, turn on your computer for a minute or two to warm it up, then turn it off. The heat will soften the old thermal paste, making it easier to remove the cooler.
- Wipe Off Old Paste: Use a lint-free cloth (such as a microfiber cloth or coffee filter) or a cotton swab to gently wipe away the old thermal paste.
- Use Isopropyl Alcohol: Lightly dampen the cloth or swab with 90% (or higher) isopropyl alcohol. Clean both the CPU and cooler surfaces in small circular motions or from the center outward until all residue is gone.
- Let It Dry
Allow both surfaces to air dry completely for a few minutes. Isopropyl alcohol evaporates quickly, but make sure everything is fully dry before applying the new paste.
Turn off and unplug your PC, clean off the old thermal paste with isopropyl alcohol and a lint-free cloth, let it dry, then apply new thermal paste.
How to Apply Thermal Paste
- Pea-Sized Dot (Most Recommended)
Just put a small dot,about the size of a green pea,in the center of your CPU. When you install the cooler, it will press down and spread the paste evenly by itself.
- Easy and effective.
- Minimizes air bubbles.
- Works well for most CPUs (both AMD and Intel).
Tip: Don’t spread it yourself; let the cooler do the work!
- Line Method
Apply a thin line of paste across the middle of the CPU, either horizontally or vertically,best for rectangular CPUs like many Intel chips.
- Ensures the paste spreads lengthwise across the chip.
Tip: Keep the line thin to avoid overflow.
- X-Pattern (Cross Method)
Draw a small “X” of thin paste lines across the CPU surface,great for bigger or multi-core CPUs.
- Covers the CPU more evenly, corner-to-corner.
Tip: Keep lines thin to prevent too much paste when pressing the cooler.
- Spread Method
Use a clean plastic card or spreader to manually spread a thin, even layer of paste over the whole CPU surface.
- Good for full, uniform coverage if you want precise control.
- Takes more time and skill.
- Higher chance of trapping air bubbles if not done carefully.
Tip: Don’t use your fingers and avoid gaps or bubbles.
- X + Dots (Advanced Users)
Place several small dots, sometimes combined with an X-pattern, across large or irregular CPUs to ensure full coverage.
- Best for very large or multi-core CPUs.
- Requires experience and careful application to avoid excess paste.
Tip: Only use if you know what you’re doing.
For most users, applying a pea-sized dot or X-pattern of thermal paste is best. Use a moderate, even amount, avoid using your fingers, and never reuse old paste.
Troubleshooting Common Issues After Applying Thermal Paste
If your computer overheats, won’t start, or the CPU fan doesn’t spin after applying thermal paste, here’s how to troubleshoot:
- Overheating Issues
- Using too much or too little paste blocks heat transfer. Apply a pea-sized dot (AMD) or several small dots (Intel).
- Avoid spreading paste with fingers to prevent air bubbles; let the heatsink pressure spread it naturally.
- Ensure the heatsink is mounted evenly by tightening screws in a diagonal pattern.
- Check the liquid cooler pumps and cables, if applicable.
- Fix by removing the cooler, cleaning with isopropyl alcohol, reapplying the paste properly, reinstalling the cooler, and monitoring temperatures.
- System Won’t Boot, or the Fan Doesn’t Spin
- Verify CPU fan and pump are plugged into the correct headers.
- Reseat power cables and check the CPU socket for bent pins or debris.
- Clear CMOS if needed.
- Test by running minimal hardware to isolate faulty parts.
Most issues come from improper paste application or cooler installation. Clean, apply paste carefully, and double-check connections for a stable, cool system.